"The day you stop learning SharePoint is the day you stop using it."

Delete Drop Off Library through PowerShell

Simply deactivating Content Organizer Feature won’t help in deleting the Drop Off Library.

Execute the below PowerShell Script and get the job done:

Solution:
$url = "http://<siteurl>/"
$feature = Get-SPFeature "DocumentRouting"
$site = New-Object Microsoft.SharePoint.SPSite($url)
foreach ($web in $site.AllWebs)
{
if ($web.Features[$feature.ID])
{
Disable-SPFeature $feature -Url $web.Url -Force -Confirm:$false
}
$list = $web.Lists["DROP OFF LIBRARY"]
if (!$list)
{
Write-Host "-Drop Off Library not found";
}
else
{
Write-Host "-"$list “ was found in web" $web
$list.AllowDeletion = $true;
$list.Update()
}
}
Share:

SHAREPOINT 2010 RIBBON CUSTOMIZATION – Add a Print button on document library’s display form ribbon


This was again a custom requirement by one of the client based in Singapore who requested to add a print button in the document library’s display form ribbon to print the display form. And again I developed a custom feature in Visual Studio 2010 starting with an Empty SharePoint Project template.

Here are the steps to start developing the custom feature.

1)    Follow the steps and create an Empty SharePoint Project as given in the article:
http://sharepointdecode.blogspot.in/2012/05/display-warning-message-box-on-click-of.html
2)  While following the steps in above article at step 8) copy and paste the below code.
<CustomAction
   Id="PrintRibbonButton.Action" Location="CommandUI.Ribbon"
   RegistrationType="List" RegistrationId="101">
    <CommandUIExtension>
      <CommandUIDefinitions>
        <CommandUIDefinition Location="Ribbon.ListForm.Display.Manage.Controls._children">
          <Button Id="PrintList" Command="PrintList" Description="Print List" LabelText="Print"
          Image32by32="~/_layouts/Images/CustomPrintButton/printdoc.png"     TemplateAlias="o1" Sequence="20"/>
        </CommandUIDefinition>
      </CommandUIDefinitions>
      <CommandUIHandlers>
        <CommandUIHandler Command="PrintList" CommandAction="javascript:window.print();" />
      </CommandUIHandlers>
    </CommandUIExtension>
  </CustomAction>

3)  Here you have to perform an additional step to add the print button icon. Right click the project and click Add -> SharePoint Mapped Folder and select Template -> IMAGES from the Add SharePoint Mapped Folder.


    You will notice a folder created in your project file. Now add print icon image in the 
created Image folder. If you do not have a 32x32 print icon then you may download it from here: http://www.softicons.com/free-icons/toolbar-icons/32x32-free-design-icons-by-aha-soft/print-icon

In my case I added the print icon under a folder name “CustomPrintButton”, Image32by32="~/_layouts/Images/CustomPrintButton/printdoc.png"
This will automatically add the print icon image to IMAGES folder of 14 hive

Now you are at the final step. Build the solution and deploy.

Please make a note here the solution will be automatically deploy to the site you selected for debugging. To deploy the solution to other web application you should use the SharePoint 2010 Management Shell.

To add and install the custom feature to other web application refer to the Microsoft technet site:

YES ! You have done creating the custom solution. Now after successful deployment of the print custom feature go to your SharePoint Site and under site collection features activate it. 
HAPPY PRINITING……… J
Share:

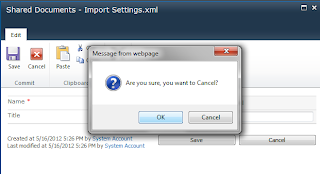
SHAREPOINT 2010 RIBBON CUSTOMIZATION - Display a warning message box on click of Cancel button of EditForm Ribbon

One of our customer based in Singapore requested to display a warning message on click of Cancel button of an EditForm of SharePoint Foundation 2010 document library. This feature is not available OOB, you need to develop a custom feature through Visual Studio 2010 as I did.

You need to follow the below sequence of steps to achieve the above goal:-
   1)    Go to the server where your SharePoint Server/Foundation is installed.
   2)    Start Visual Studio 2010 and Create an Empty SharePoint Project.
   3)    Select the site for debugging and select “Deploy as a Sanboxed Solution.”

Now your new Empty SharePoint Project is created.
   4)    In the Solution Explorer, right click Feature folder and Select “Add Feature.”


5) After adding Feature, add an Empty Element by right clicking the Project and select Add -> New Item.


6) Select the Empty Element template and provide an appropriate name to it.


7)    
Open the Elements.xml under CustomRibbonElement (Empty Element template). I named the Empty Element as “CustomRibbonElement.”


8)   
Now in the opened Elements.xml you need to add xml code to create the custom feature.

And here is the complete code:
<?xml version="1.0" encoding="utf-8"?>
<Elements xmlns="http://schemas.microsoft.com/sharepoint/">

  <CustomAction
     Id="DisplayDialogBox"
     Location="CommandUI.Ribbon"
     RegistrationId="101"
   RegistrationType="List">
    <CommandUIExtension>
      <CommandUIDefinitions>
        <CommandUIDefinition Location="Ribbon.DocLibListForm.Edit.Commit.Cancel"/>
      </CommandUIDefinitions>
    </CommandUIExtension>
  </CustomAction>
  
  <CustomAction Id="Ribbon.Edit.Cancel.Msgbox"
                  Location="CommandUI.Ribbon" >
    <CommandUIExtension>
      <CommandUIDefinitions>
        <CommandUIDefinition Location="Ribbon.DocLibListForm.Edit.Commit.Controls._children">
          <Button
                Id="Ribbon.Edit.Cancel.MyButton"
                Sequence="20"
                Command="ConfirmClose"
                Image16by16="/_layouts/$Resources:core,Language;/images/formatmap16x16.png" Image16by16Top="0" Image16by16Left="-248"
                Image32by32="/_layouts/$Resources:core,Language;/images/formatmap32x32.png" Image32by32Top="-448" Image32by32Left="-288"
                LabelText="$Resources:core,cui_ButListFormCancel;"
                ToolTipTitle="$Resources:core,cui_ButListFormCancel;"
                ToolTipDescription="$Resources:core,cui_STT_ButListFormCancel;"
                TemplateAlias="o1"/>
        </CommandUIDefinition>
      </CommandUIDefinitions>
      <CommandUIHandlers>
        <CommandUIHandler Command="ConfirmClose"
                          CommandAction="javascript:if(confirm('Are you sure, you want to Cancel?')){SP.UI.ModalDialog.get_childDialog().close();}"/>
      </CommandUIHandlers>
    </CommandUIExtension>
  </CustomAction>
  
</Elements>


Now you are at the final step. Build the solution and deploy.

Please make a note here the solution will be automatically deploy to the site you selected for debugging. To deploy the solution to any web application you should use the SharePoint 2010 Management Shell.

To add and install the custom feature to any web application refer to the Microsoft technet site:
First add the solution: http://technet.microsoft.com/en-us/library/ff607552.aspxSecond install the solution: http://technet.microsoft.com/en-us/library/ff607534.aspx

Here is the output:


Share:

Increase SharePoint Site template and List template size (2007/2010)

You are trying to save a site or a list (with content) as a template in SharePoint 2007/2010, but it gives you this error:
"The list is too large to save as a template. The size of a template cannot exceed 10485760 bytes."
OR "The site is too large to save as template. The size of template cannot exceed 10485760 bytes.”

It is pretty easy to increase the size of template in SharePoint. This quick little stsadm command will allow to increase the template size for site and list both. Open the Windows Command Prompt and change the path to 
“C:\Program Files\Common Files\Microsoft Shared\web server extensions\12\BIN”\ and then type the below stsadm command: 

stsadm -o setproperty -pn max-template-document-size -pv 524287999 


The above command will allow you to save the site/list to 500 MB. Increasing the size beyond 500 MB will not allow you to do so, it will throw an error. 
Just remember the default size is 10MB (10485760).
Well the above script is applicable for MOSS 2007, now lets see the script for SharePoint 2010.
 

For SharePoint 2010, open Windows PowerShell and type the below command:

$intTemplateSize=524287999
$svcWebService= [Microsoft.SharePoint.Administration.SPWebService]::ContentService
$svcWebService.MaxTemplateDocumentSize = $intTemplateSize
$svcWebService.Update()
Share:

Delete InfoPath Published Columns or Hidden Columns

Some of you may have encountered the problem of deleting the InfoPath published columns. These columns are actually published as Content Types, so better we call them as content types. A custom column is easy to delete using OOB feature but deleting an InfoPath published column is pain in the arse. Below is a small script that will help you delete the InfoPath published columns.

Note:
The below PowerShell Script can be use to delete any type of column - custom, InfoPath, or hidden

function Delete-WorkflowColumn ($webURL, $listName, $columnName)
    {
        #Setup variables from the user input
        $web = Get-SPWeb $webURL
        $list = $web.Lists[$listName]
        $column = $list.Fields[$columnName]
       
        #Make sure the column is not hidden or read only
        $column.Hidden = $false
        $column.ReadOnlyField = $false
        $column.Update()

        #Delete column and dispose of the web object
        $list.Fields.Delete($column)
        write-host "Deleted column"
        $web.Dispose()
    } //Press Enter

Delete-WorkflowColumn -webURL http://pro1:4444/sites/test -listName "EmpList" 

-columnName "EmpAddress"
//Press Enter

That's All... You are Done !!!


Share:

Error "Updates are currently disallowed in GET requests. To allow updates on a GET, set the 'AllowUnsafeUpdates' property on SPWeb".

You may encounter an exception when accessing General Settings or Resource Throttling for a web application in Central Administration:


Solution:
Open SharePoint Management Shell and execute the below commands:

$w = get-spwebapplication http://<web application url>
$w.HttpThrottleSettings
$w.Update()
Share:

How to debug Windows Service in Visual Studio 2010

Most of the developers are unaware of the Visual Studio capability to debug Windows Service. On most of the blogs and forums I found common solutions speaking about attaching a debugger/process to the Windows Service.

While working on a SharePoint project my team came across a requirement to develop a Windows Service that consumes a SharePoint Web Service “Lists.asmx”. This was basically required to access the SharePoint list and its items via Windows Service.


As Windows Service does not have an UI, it’s a bit tricky to debug it. In this article I have explained how you can debug a Windows Service in Visual Studio 2010.


Steps:
Right click on the method that you want to debug and select Create Unit Test.
This will automatically create a Test Project in the solution explorer. Open the UnitTest1.cs and have a look at the code. This code can be manually developed but if Visual Studio can do it for you at a click of a button, it’s great! You may save your precious time for development, isn’t it?

Code Snippet generated by Visual Studio 2010 in UnitTest1.cs file:

using System;
using ServiceToUpdateList;
using Microsoft.VisualStudio.TestTools.UnitTesting;

namespace TestProject1
{
    [TestClass()]
    public class Service1Test
    {
        private TestContext testContextInstance;
        public TestContext TestContext
        {
            get
            {
                return testContextInstance;
            }
            set
            {
                testContextInstance = value;
            }
        }

        #region Additional test attributes

        #endregion

        [TestMethod()]
        public void ReadingFromEmployeeDetailsListTest()
        {
Service1 target = new Service1 ();                 target.ReadEmployeeDetails ();          
        }

Service1 is my class name and ReadEmployeeDetails is my function name that I want to debug.

Attach breakpoint in your code file. Build your solution and click on Debug Tests in Current Context icon on the Test Tools toolbar. This will execute your code in debug mode in Visual Studio IDE.

Ensure that Test Tools is displayed on the toolbar, if not displayed go to View Menu -> Toolbars -> Test Tools.

Note: If you have created an App.config file in Windows Service then that App.config file must be copied to the Test Project as well. Because the Test Project will not read App.config of your Service Project, instead it reads from the Test Project.
Share:

SharePoint-StackExchange Moderator

Author's Profile

My photo
India
A SharePoint Enthusiast working as a Lead Solution Architect for an IT Software & Consulting Company in Mumbai. I believe in giving back to the community through which I also learn and develop and eventually grow as an individual and professional. This blog is a small contribution to the community where I live in and may help someone who is seeking knowledge like me.

Popular Posts

Powered by Blogger.

Contact Form

Name

Email *

Message *

Total Pageviews