"The day you stop learning SharePoint is the day you stop using it."

Difference between “Manage Users” and “Share Project Web App” in Project Server 2013

At some point of time I was quite confused why there would be two ways to assign permission to users in Project Server and with different names and settings. These two ways are – “Manage Users” and “Share Project Web App”.

Have you ever found the difference between the two? You are guessing right… YES there is a difference. You must be aware of the fact that Project Server 2013 has two permission modes, one is the SharePoint Permission Mode and the other is Project Server Permission Mode. By default after installing Project Server 2013 setup, the Project Web App is configured in SharePoint Permission Mode.

In SharePoint Permission Mode, the Security category would be missing from PWA Settings.


The “Share Project Web App” only works when your PWA is configured in SharePoint Permission Mode. The “Share Project Web App” does not works in Project Server Permission Mode. What if you want to change your PWA permission mode from SharePoint Permission Mode to Project Server Permission Mode, is it possible? Yes it is and the steps are very simple…

Have a look: http://technet.microsoft.com/en-us/library/jj219486.aspx

The Manage Users is available for Project Server Permission Mode. So when you have changed the permission mode, the Security category in PWA settings would be available now.
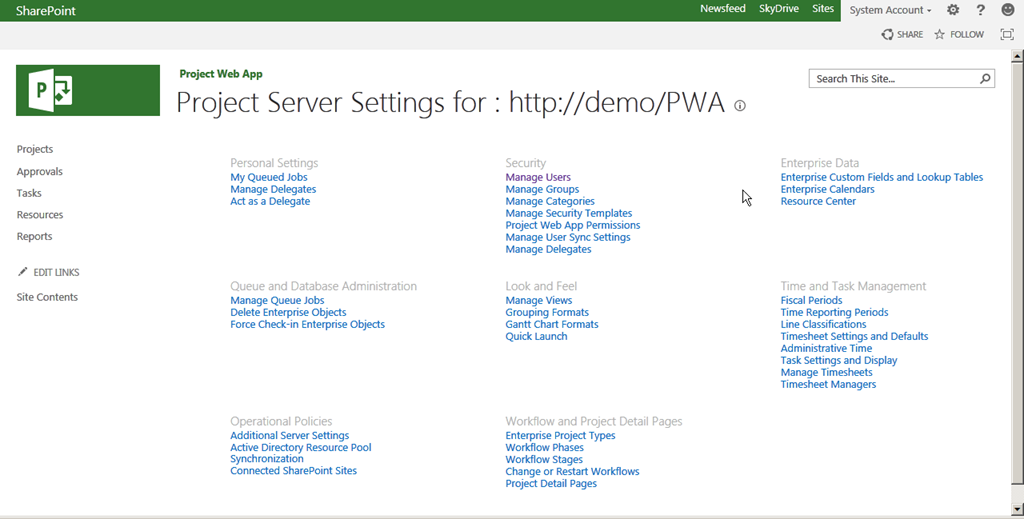


So do remember, when you have configured your PWA in Project Server Permission Mode then you must only use Security category to grant access to users and do not use “Share Project Web App.”

Share:

STEPS TO AUTOMATE BACKUP OF SHAREPOINT 2010 SITE COLLECTION

1.     Open the notepad and copy the below script.

Add-PsSnapin Microsoft.SharePoint.PowerShell
Start-SPAssignment -Global

$mySite="http://sitecollectionURL"
$backupLocation="D:\SiteBackup"
$logFile="$backupLocation\BackupLog.log"
$today=Get-Date -format "MM-dd-yyyy HH.mm.ss"

try
{
Backup-SPSite $mySite -Path $backupLocation\SPSite_$today.bak -force
write "$today $mySite successfully backed up">>$logFile   
}

catch
{
write-Host Backup process failed
See $logFile for more information.    
write "$today  Error: $_">>$logFile
}   

Stop-SPAssignment -Global
Remove-PsSnapin Microsoft.SharePoint.PowerShell
write-Host "Task Finished"
  • In the script specify your site collection url at variable $mySite =”http://sitecollectionURL
  • Specify the backup location at variable $backupLocation="D:\SiteBackup"
  • Create a Backup log text file in the same backup location with the name “BackupLog”
  • Provide an appropriate name for the file and save the file with a “.ps1” extension.
You can repeat the process from step 1 to 5 for different site collections. In this way you can have multiple PowerShell scripts for every site collection.
Or you can declare new variables like,
$mySite1=http://siteURL1”         
$mySite2=http://siteURL2

And add additional Backup-SPSite command in the above script.
Example:
Backup-SPSite $mySite1 -Path $backupLocation\Site1_$today.bak –force
                Backup-SPSite $mySite2 -Path $backupLocation\Site2_$today.bak –force 

Example:

Add-PsSnapin Microsoft.SharePoint.PowerShell
Start-SPAssignment -Global

$mySite1=”http://site1.domain.com
$mySite2=”http://site2.domain.com
$mySite3=”http://site3.domain.com
$mySite4=”http://site4.domain.com
$backupLocation="D:\SiteBackup"
$logFile="$backupLocation\BackupLog"
$today=Get-Date -format "MM-dd-yyyy HH.mm.ss"

try
{
Backup-SPSite $mySite1 -Path $backupLocation\Site_IAM_$today.bak –force
write "$today   $mySite1 successfully backed up.">>$logFile   

Backup-SPSite $mySite2 -Path $backupLocation\Site_ArtWork_$today.bak –force
write "$today   $mySite2 successfully backed up.">>$logFile   

Backup-SPSite $mySite3 -Path $backupLocation\Site_ContractsDB_$today.bak –force
write "$today   $mySite3 successfully backed up.">>$logFile   

Backup-SPSite $mySite4 -Path $backupLocation\Site_Partners_$today.bak –force
write "$today   $mySite4 successfully backed up.">>$logFile   
}

catch
{
write "$today    Error: $_">>$logFile
}   
Stop-SPAssignment -Global
Remove-PsSnapin Microsoft.SharePoint.PowerShell

Now schedule the backup task to automate and execute it whenever you require such as daily, weekly, monthly or yearly using Task Scheduler.
  • Start the Windows Task Scheduler by clicking on Start -> Administrative Tools ->Task Scheduler.
  • From Actions, select Create Task.
  • Under the General Tab, provide a name and a description (Ex: Backup of SharePoint Sites….) and choose the “Run whether user is logged on or not” and check the “Run with highest privileges” checkbox.
  • Under the Triggers tab, click New and schedule a Daily or as often as you like to run the task and click OK.
  • Under the Actions tab, click New and keep the Action parameter as Start a program. In the Program/script textbox type powershell.exe and next to Add arguments textbox, provide the path of your script file location (Ex: D:\SPBackup\SPSite_Backup.ps1) click OK and provide the credentials of FARM Admin or at least Site Collection Administrator when prompted.

Share:

Security Token Service not responding in Project Server 2013

I was facing a serious issue from past couple of days… The Project Server 2013 Web App was inaccessible. After monitoring ULS logs and Event Viewer, following exceptions I encountered. These exceptions were continuously occurring and I was not able to find the root cause. Hence after consulting Microsoft Support team, we both managed to get rid of the exceptions and finally the Project Server Web App was accessible.

The HTTP service located at http://localhost:32843/SecurityTokenServiceApplication/securitytoken.svc is unavailable.  This could be because the service is too busy or because no endpoint was found listening at the specified address. Please ensure that the address is correct and try accessing the service again later.

Application pool ‘SecurityTokenServiceApplicationPool’ is being automatically disabled due to a series of failures in the process(es) serving that application pool.

Event 8306 (SharePoint Foundation) of severity ‘Error’ occurred 58 more time(s) and was suppressed in the event log.

Event 6398 (SharePoint Foundation) of severity ‘Critical’ occurred 8 more time(s) and was suppressed in the event log.


Analysis:
Based on the error message: “A listener channel for protocol ‘HTTP’ in worker process ‘5532’ serving application pool ‘SecurityTokenServiceApplicationPool’ reported a listener channel failure.  The data field contains the error number.” and error message:” The Module DLL ‘C:\Program Files\Common Files\Microsoft Shared\Web Server Extensions\15\isapi\spnativerequestmodule.dll’ could not be loaded due to a configuration problem. The current configuration only supports loading images built for a x86 processor architecture.” The issue is probable caused by the failure during the loading of spnativerequestmodule.dll file.

Resolution:
Navigate to IIS Manager-> Application Pools-> right click the ‘SecurityTokenServiceApplicationPool’ and choose “Advanced Settings”. If “Enable 32-Bit Applications” is set to “true”, please set it to “false”, reset IIS and your are done !!
Happy accessing Project Server Web App… :)
Share:

Delete Drop Off Library through PowerShell

Simply deactivating Content Organizer Feature won’t help in deleting the Drop Off Library.

Execute the below PowerShell Script and get the job done:

Solution:
$url = "http://<siteurl>/"
$feature = Get-SPFeature "DocumentRouting"
$site = New-Object Microsoft.SharePoint.SPSite($url)
foreach ($web in $site.AllWebs)
{
if ($web.Features[$feature.ID])
{
Disable-SPFeature $feature -Url $web.Url -Force -Confirm:$false
}
$list = $web.Lists["DROP OFF LIBRARY"]
if (!$list)
{
Write-Host "-Drop Off Library not found";
}
else
{
Write-Host "-"$list “ was found in web" $web
$list.AllowDeletion = $true;
$list.Update()
}
}
Share:

SHAREPOINT 2010 RIBBON CUSTOMIZATION – Add a Print button on document library’s display form ribbon


This was again a custom requirement by one of the client based in Singapore who requested to add a print button in the document library’s display form ribbon to print the display form. And again I developed a custom feature in Visual Studio 2010 starting with an Empty SharePoint Project template.

Here are the steps to start developing the custom feature.

1)    Follow the steps and create an Empty SharePoint Project as given in the article:
http://sharepointdecode.blogspot.in/2012/05/display-warning-message-box-on-click-of.html
2)  While following the steps in above article at step 8) copy and paste the below code.
<CustomAction
   Id="PrintRibbonButton.Action" Location="CommandUI.Ribbon"
   RegistrationType="List" RegistrationId="101">
    <CommandUIExtension>
      <CommandUIDefinitions>
        <CommandUIDefinition Location="Ribbon.ListForm.Display.Manage.Controls._children">
          <Button Id="PrintList" Command="PrintList" Description="Print List" LabelText="Print"
          Image32by32="~/_layouts/Images/CustomPrintButton/printdoc.png"     TemplateAlias="o1" Sequence="20"/>
        </CommandUIDefinition>
      </CommandUIDefinitions>
      <CommandUIHandlers>
        <CommandUIHandler Command="PrintList" CommandAction="javascript:window.print();" />
      </CommandUIHandlers>
    </CommandUIExtension>
  </CustomAction>

3)  Here you have to perform an additional step to add the print button icon. Right click the project and click Add -> SharePoint Mapped Folder and select Template -> IMAGES from the Add SharePoint Mapped Folder.


    You will notice a folder created in your project file. Now add print icon image in the 
created Image folder. If you do not have a 32x32 print icon then you may download it from here: http://www.softicons.com/free-icons/toolbar-icons/32x32-free-design-icons-by-aha-soft/print-icon

In my case I added the print icon under a folder name “CustomPrintButton”, Image32by32="~/_layouts/Images/CustomPrintButton/printdoc.png"
This will automatically add the print icon image to IMAGES folder of 14 hive

Now you are at the final step. Build the solution and deploy.

Please make a note here the solution will be automatically deploy to the site you selected for debugging. To deploy the solution to other web application you should use the SharePoint 2010 Management Shell.

To add and install the custom feature to other web application refer to the Microsoft technet site:

YES ! You have done creating the custom solution. Now after successful deployment of the print custom feature go to your SharePoint Site and under site collection features activate it. 
HAPPY PRINITING……… J
Share:

SharePoint-StackExchange Moderator

Author's Profile

My photo
India
A SharePoint Enthusiast working as a Lead Solution Architect for an IT Software & Consulting Company in Mumbai. I believe in giving back to the community through which I also learn and develop and eventually grow as an individual and professional. This blog is a small contribution to the community where I live in and may help someone who is seeking knowledge like me.

Popular Posts

Powered by Blogger.

Contact Form

Name

Email *

Message *

Total Pageviews